
Limited-Time Offer: Enjoy 50% Savings! Ends in 00h 00m 00s Coupon code: 50OFF
Skip to content

Free Oracle Cloud Infrastructure 2025 Security Professional 1Z0-1104-25 Exam Questions

Page: 1 / 6 Total 36 questions

Want more questions? Get Premium Access.

Question 1

SIMULATION

Task 5: Create a Certificate

Create a certificate, where:

Certificate name: PBT-CERT-01-

For example, if your username is 99008677-lab.user01, then the certificate name should be PBT-CERT-01990086771abuser01

Ensure you eliminate special characters from the user name.

Common name: PBT-CERT-OCICERT-01

Certificate Authority: PBT-CERT-CA-01 (created in the previous task)

Correct Answer: A. See the solution below in Explanation
Explanation:

Since I can't create resources or retrieve OCIDs directly in your OCI environment, I'll provide a step-by-step solution based on verified OCI documentation and best practices as of 02:30 PM BST on Thursday, June 12, 2025. Follow these instructions precisely in the OCI Console or CLI, using the preconfigured PBI_Vault_SP vault and the PBT-CERT-CA-01<username> Certificate Authority created in the previous task. Replace <username> with your actual username (e.g., 99008677-lab.user01), ensuring special characters are removed.

Task 5: Create a Certificate

Step 1: Access the OCI Vault

Log in to the OCI Console.

Navigate to Identity & Security > Vault.

Select the root compartment.

Locate and click on the vault named PBI_Vault_SP.

Step 2: Create the Certificate

In the PBI_Vault_SP vault details page, under Resources, click Certificates.

Click Create Certificate.

Enter the following details:

Name: Replace <username> with your username (e.g., if your username is 99008677-lab.user01, remove special characters like - and . to get 99008677labuser01, then use PBT-CERT-0199008677labuser01).

Common Name: Enter PBT-CERT-OCICERT-01.

Certificate Authority: Select the PBT-CERT-CA-01<username> CA created in Task 4 (e.g., PBT-CERT-CA-0199008677labuser01).

Subject: Leave as default or adjust (e.g., Organization, Country) if required.

Validity Period: Set as needed (e.g., 1 year), or use the default.

Compartment: Ensure it's set to the root compartment.

Click Create Certificate and wait for the certificate to be issued.

Step 3: Verify the Certificate

After creation, go to the Certificates section under PBI_Vault_SP.

Confirm the certificate PBT-CERT-01<username> (e.g., PBT-CERT-0199008677labuser01) is listed and its status is active.
Question 2

An E-commerce company running on Oracle Cloud Infrastructure (OCI) wants to prevent accidental misconfigurations that could expose sensitive data. They need an OCI service that can enforce predefined security rules when creating or modifying cloud resources.

Which OCI service should they use?

Correct Answer: C. OCI Security Zone

Question 3

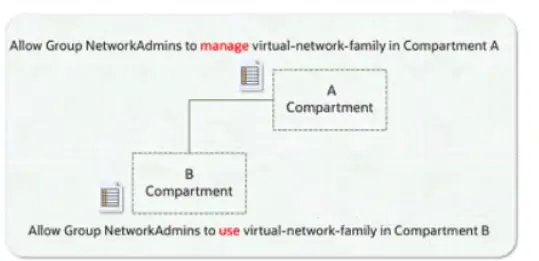
A company has implemented OCI IAM policies with multiple levels of compartments. A policy attached to a parent compartment grants "manage virtual-network-family" permissions. A policy attached to a child compartment grants "use virtual-network-family" permissions.

According to OCI IAM policy inheritance, how does the OCI IAM policy engine resolve the permissions for a user attempting to perform an operation that requires 'manage' permissions in the child compartment?

Correct Answer: B. The policy in the parent compartment takes precedence, and the user is granted 'manage' permissions.

Question 4

SIMULATION

Challenge 2

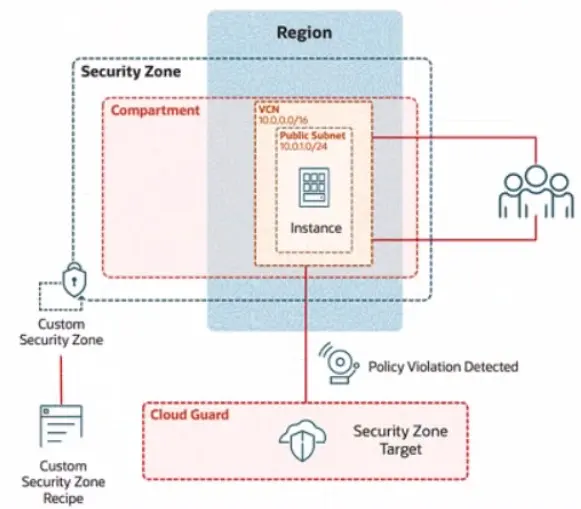
In deploying a new application, a cloud customer needs to reflect different security postures. If a security zone is enabled with the Maximum Security Zone recipe, the customer will be unable to create or update a resource in the security zone if the action violates the attached Maximum Security Zone policy.

As an application requirement, the customer requires a compute instance in the public subnet. You therefore, need to configure Custom Security Zones that allow the creation of compute instances in the public subnet.

Review the architecture diagram, which outlines the resoures you'll need to address the requirement:

Preconfigured

To complete this requirement, you are provided with the following:

Access to an OCI tenancy, an assigned compartment, and OCI credentials

Required IAM policies

Task 5: Provision a Compute Instance

Provision a compute instance in the IAD-SP-PBT-PUBSNET-01 public subnet, where:

Name IAD-SP-PBT-1-VM-01

image: Oracle Linux 8

Shape VM: Standard, A1, Flex

Enter the OCID of the created compute instance in the text box below.

Correct Answer: A. See the solution below in Explanation
Explanation:

To provision a compute instance named IAD-SP-PBT-1-VM-01 in the IAD-SP-PBT-PUBSNET-01 public subnet with the specified configuration (Oracle Linux 8 image, VM Standard A1 Flex shape), follow these steps based on the Oracle Cloud Infrastructure (OCI) Compute documentation.

Step-by-Step Solution for Task 5: Provision a Compute Instance

Log in to the OCI Console:

Use your OCI credentials to log in to the OCI Console (https://console.us-ashburn-1.oraclecloud.com).

Ensure you have access to the assigned compartment.

Navigate to Compute Instances:

From the OCI Console, click the navigation menu (hamburger icon) on the top left.

Under Compute, select Instances.

Create a New Compute Instance:

Click the Create Instance button.

Configure the Instance Details:

Name: Enter IAD-SP-PBT-1-VM-01.

Compartment: Select the assigned compartment.

Placement: Choose the availability domain (e.g., AD-1) based on your region's availability.

Select the Image:

Under Image and Shape, click Change Image.

Select Oracle Linux 8 from the platform images list.

Click Select Image.

Choose the Shape:

Click Change Shape.

Select VM Standard category.

Choose A1 Flex from the shape options.

Configure the OCPUs (e.g., 1 OCPU) and memory (e.g., 6 GB) as needed for A1 Flex, then click Select Shape.

Configure Networking:

Under Networking, ensure the Virtual Cloud Network is set to IAD-SP-PBT-VCN-01.

Set the Subnet to IAD-SP-PBT-PUBSNET-01 (public subnet with CIDR 10.0.1.0/24).

Enable Assign a public IPv4 address to allow external connectivity.

Leave the default security list or assign a custom one if configured previously.

Set Up SSH Access:

Under Add SSH Keys, either:

Upload your public SSH key file, or

Paste your public SSH key manually.

This ensures you can access the instance via SSH.

Launch the Instance:

Click Create to provision the compute instance.

Wait for the instance to reach the Running state (this may take a few minutes).

Note the Instance OCID:

Once the instance is running, go to the instance details page for IAD-SP-PBT-1-VM-01.

Copy the OCID displayed (e.g., ocid1.instance.oc1..<unique_string>).

OCID of the Created Compute Instance

Enter the OCID of the created compute instance (IAD-SP-PBT-1-VM-01) into the text box. The exact OCID will be available after Step 9 (e.g., ocid1.instance.oc1..<unique_string>).

Notes

Ensure the security zone IAD_SAP-PBT-CSZ-01 and its associated recipe IAD-SP-PBT-CSP-01 allow compute instance creation in the public subnet (10.0.1.0/24).

Verify network connectivity by testing SSH access using the public IP assigned to the instance.


Question 5

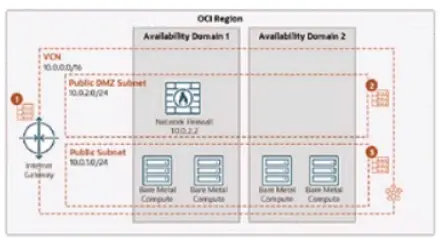
A company is securing its compute instances (VMs and Bare Metal Machines) in Oracle Cloud infrastructure (OCI) using a network firewall. As shown in the diagram, traffic flows from the internet Gateway (IGW) to the firewall in the Public DMZ Subnet, and then to the compute instances in the Public Subnet.

When configuring security lists and network security groups (NSGs) in this setup, what should they consider?

Correct Answer: B. Ensure that any security list or NSG rules allow the traffic to enter the firewall for appropriate evaluation.

Question 6

SIMULATION

Task 6: Create Load Balancer and Attach Certificate

Create a Load Balancer with the name PBT-CERT-LB-01 in subnet LB-Subnet-PBT-CERT-SNET-02

Create a Listener for the load balancer, where:

Name: PBT-CERT-LB_LTSN_01

Protocol: HTTPS

Port: 443

Attach the certificate PBT-CERT-01- to the load balancer

Attach the security list PBT-CERT-LB-SL-01 to subnet LB-Subnet-PBT-CERT-SNET-02

Correct Answer: A. See the solution below in Explanation
Explanation:

Task 6: Create Load Balancer and Attach Certificate

Step 1: Create the Load Balancer

Log in to the OCI Console.

Navigate to Networking > Load Balancers.

Click Create Load Balancer.

Enter the following details:

Name: PBT-CERT-LB-01

Compartment: Select your assigned compartment.

Load Balancer Type: Select Public.

Virtual Cloud Network: Select PBT-CERT-VCN-01.

Subnet: Select LB-Subnet-PBT-CERT-SNET-02.

Shape: Choose a shape (e.g., 10 Mbps, adjust based on needs).

Click Next.

Leave backend sets and listeners as default for now (we'll configure the listener next).

Click Create Load Balancer and wait for it to be provisioned.

Step 2: Create a Listener

Once the load balancer is created, go to the Load Balancers page and click on PBT-CERT-LB-01.

Under Resources, click Listeners.

Click Create Listener.

Enter the following details:

Name: PBT-CERT-LB_LTSN_01

Protocol: Select HTTPS.

Port: Enter 443.

Certificate: Click Add Certificate, then select the PBT-CERT-01<username> certificate (e.g., PBT-CERT-0199008677labuser01) created in Task 5.

Leave other settings (e.g., SSL handling) as default unless specified.

Click Create.

Step 3: Configure the Backend Set

In the PBT-CERT-LB-01 details page, under Resources, click Backend Sets.

Click Create Backend Set (if not already created).

Enter basic details (e.g., name like PBT-CERT-BS-01).

Add a backend server:

IP Address: Use the private IP of PBT-CERT-VM-01 (find this in the instance details under Compute > Instances).

Port: 80 (HTTP, as configured on the web server).

Protocol: HTTP.

Click Create.

Step 4: Attach the Security List to the Subnet

Navigate to Networking > Virtual Cloud Networks.

Select PBT-CERT-VCN-01 and click Subnets.

Click on LB-Subnet-PBT-CERT-SNET-02.

Under Security Lists, ensure PBT-CERT-LB-SL-01 is attached. If not:

Click Edit.

Remove the default security list and add PBT-CERT-LB-SL-01.

Click Save Changes.

Step 5: Verify the Configuration

Ensure the load balancer health status is OK (check under Backend Sets > Health).

Test by accessing https://<load-balancer-public-ip> in a browser (replace with the public IP from the load balancer details).