
Limited-Time Offer: Enjoy 50% Savings! Ends in 00h 00m 00s Coupon code: 50OFF
Skip to content

Free Workday Pro Integrations Certification Exam Workday-Pro-Integrations Exam Questions

Page: 1 / 11 Total 109 questions

Want more questions? Get Premium Access.

Question 1

You have successfully configured an ISU and an ISSG with the correct security policies and have assigned them to an EIB.

What task do you need to run before you can launch the EIB?

Correct Answer: A. Activate Pending Security Policy Changes
Explanation:

In Workday, after configuring an Integration System User (ISU) and an Integration System Security Group (ISSG) with the appropriate security policies and assigning them to an Enterprise Interface Builder (EIB) integration, there is a critical step required before the EIB can be launched successfully. This step ensures that all security configurations and permissions assigned to the ISSG take effect in the Workday tenant. Let's analyze the question and evaluate each option systematically to determine the correct task, ensuring the answer aligns with Workday's documented processes and the Workday Pro Integrations Study Guide.

Context of the Scenario

You've completed the following:

Created an ISU and configured it (e.g., with 'Do Not Allow UI Sessions' checked for web service-only access).

Set up an ISSG and assigned the ISU to it.

Defined the necessary security policies (e.g., domain security policies with 'Get' and/or 'Put' access) for the ISSG to support the EIB's operations.

Assigned the ISU and ISSG to the EIB integration system.

The question now is what must be done before launching the EIB to ensure it functions as intended. In Workday, changes to security policies---such as adding permissions to an ISSG---do not take effect immediately. They remain in a 'pending' state until activated, which is a key aspect of Workday's security administration process.

Evaluation of Options

Option A: Activate Pending Security Policy ChangesIn Workday, whenever you modify security policies (e.g., granting domain permissions like 'Integration Build' or 'Custom Report Creation' to an ISSG), these changes are staged as 'pending.' To apply them to the tenant and make them active, you must run the 'Activate Pending Security Policy Changes' task. This task reviews all pending security updates, allows you to add a comment for audit purposes, and, upon confirmation, activates the changes. Without this step, the ISSG will not have the effective permissions required for the EIB to access data or execute its operations, potentially causing the launch to fail due to insufficient authorization. This aligns directly with the scenario, as security policies have been configured and assigned, but not yet activated.

Option B: View Security for Securable ItemThe 'View Security for Securable Item' report is a diagnostic tool in Workday that allows you to inspect the security configuration for a specific object (e.g., a web service operation, report, or task). It shows which security groups have access and what permissions (e.g., 'Get,' 'Put,' 'View,' 'Modify') are granted. While this is useful for verifying that the ISSG has the correct policies assigned, it is a passive report---it does not modify or activate anything. Running this task would not enable the EIB to launch, as it doesn't affect the pending security changes. Thus, it's not the required step before launching the EIB.

Option C: Assign the ISSG to only one security policyThis option suggests limiting the ISSG to a single security policy, but this is neither a standard Workday requirement nor a task that exists as a standalone action. ISSGs can and often do have multiple security policies assigned (e.g., permissions for various domains like 'Integration Build,' 'Custom Report Access,' etc.), depending on the integration's needs. Moreover, the question states that the ISSG has already been configured with the 'correct security policies' and assigned to the EIB, implying this step is complete. Restricting the ISSG to one policy after the fact would require editing permissions again, triggering more pending changes, and still necessitate activation---making this option illogical and incorrect.

Option D: Maintain Integration Security PoliciesThere is no specific task in Workday called 'Maintain Integration Security Policies.' This option seems to be a misnomer or a conflation of other tasks, such as 'Maintain Domain Permissions for Security Group' (used to assign permissions to an ISSG) or broader security maintenance activities. However, the question indicates that the security policies are already correctly configured and assigned. If this option intended to imply further configuration, it would still result in pending changes requiring activation via Option A. As a standalone action, it does not represent a valid or necessary task to enable the EIB launch.

Why Option A is Correct

The 'Activate Pending Security Policy Changes' task is a mandatory step in Workday's security workflow after modifying security policies, such as those assigned to an ISSG for an EIB. Workday's security model uses a pending changes queue to ensure that updates are reviewed and deliberately applied, maintaining control and auditability. Without activating these changes:

The ISSG will lack the effective permissions needed for the EIB to access required domains or perform its operations (e.g., retrieving data from a custom report or delivering a file).

The EIB launch could fail with errors like 'Insufficient Privileges' or 'Access Denied.'

Running this task ensures that the security configuration is live, allowing the ISU (via the ISSG) to authenticate and execute the EIB successfully. This is a standard practice in Workday integration setup, as emphasized in the Workday Pro Integrations curriculum.

Practical Steps to Perform Option A

Log into the Workday tenant with a security administrator role.

Search for and select the 'Activate Pending Security Policy Changes' task.

Review the list of pending changes (e.g., new permissions added to the ISSG).

Enter a comment (e.g., 'Activating security for EIB launch -- ISSG permissions').

Check the 'Confirm' box and click 'OK' to activate the changes.

Once completed, the security policies are live, and the EIB can be launched.

Verification with Workday Documentation

The Workday Pro Integrations Study Guide and related training materials confirm that activating pending security policy changes is a prerequisite after configuring security for integrations. This step ensures that all permissions are in effect, enabling the ISU and ISSG to support the EIB's functionality. Community resources and implementation guides also consistently highlight this task as the final step before launching integrations that rely on updated security settings.

Workday Pro Integrations Study Guide Reference

Section: Integration Security Configuration -- Explains the process of assigning security policies to ISSGs and the need to activate changes to operationalize them.

Section: Enterprise Interface Builder (EIB) -- Notes that security updates for EIBs must be activated before launching to ensure proper access.

Section: Security Administration -- Details the 'Activate Pending Security Policy Changes' task as the mechanism to apply pending security modifications across the tenant.

Question 2

What is the workflow to chain a Document Transformation system to a Connector integration for the purpose of transforming the output?

Correct Answer: D. Add a Service step of Fire Integration to the Connector Business Process (BP)
Explanation:

To chain a Document Transformation system to a Connector Integration, you must configure the Connector Integration System's Business Process (BP) to include a 'Service step of Fire Integration', which triggers the Document Transformation after the connector completes.

From Workday documentation:

''To execute a Document Transformation after a connector integration, use the Fire Integration service step in the connector's business process to trigger the Document Transformation integration.''

This allows Workday to chain multiple integrations, such as taking the output of a Core Connector and sending it through a transformation step (e.g., XSLT) before delivering to an endpoint.

Why other options are incorrect:

A . Fire Integration in the DT BP is not used to call itself.

B . 'Integration step' in BP is not a valid step type.

C . Same issue --- DT's own BP doesn't call itself or other integrations.


Question 3

What XSL component is required to execute valid transformation instructions in the XSLT code?

Correct Answer: A. xsl:template
Explanation:

The <xsl:template> is the core component in XSLT. It defines the transformation rules that will be applied to nodes in the XML document.

''Without at least one <xsl:template> element, an XSLT file cannot perform any transformation. This is the execution block where processing logic begins.''

Why the others are incorrect:

B . <xsl:apply-templates> applies templates but is not valid without the actual template definitions.

C . <xsl:call-template> calls named templates --- which must first exist.

D . <xsl:output> defines format but does not perform transformation logic.


Question 4

You are developing a Core Connector: Worker integration with DIS enabled. You configure the Population Eligibility to include all US workers and also define the Eligibility Criterion field to return only those workers assigned to the Sales organization.

When you run the integration, the output includes all US workers instead of just those in Sales.

What should you do to ensure only workers in the Sales organization appear in the output?

Correct Answer: A. Remove the Eligibility Criteria field and apply the filtering logic in the Population Eligibility.
Explanation:

Population Eligibility controls which workers are included in the Core Connector output population. In this scenario, the Population Eligibility is configured to include all US workers, so the connector correctly outputs that entire eligible population. The Eligibility Criterion field does not replace Population Eligibility as the population filter. It can support eligibility-related logic, but it is not the correct place to enforce the final worker population restriction when the actual extract should include only Sales workers. To fix the output, the Sales organization condition must be moved into the Population Eligibility rule itself. Updating the criterion field or running a full file would not solve the problem because the population filter would still include all US workers. The integration population must be filtered at the source.


Question 5

What is the task used to upload a new XSLT file for a pre-existing document transformation integration system?

Correct Answer: C. Edit XSLT Attachment Transformation
Explanation:

In Workday, when you need to upload a new XSLT (Extensible Stylesheet Language Transformations) file to modify or replace an existing transformation within a pre-existing document transformation integration system, the specific task required is 'Edit XSLT Attachment Transformation.' This task allows users to update the XSLT file that governs how XML data is transformed within the integration system without creating an entirely new transformation object.

Here's why this is the correct answer:

Workday's integration systems often rely on XSLT to transform XML data into the desired format for downstream systems or processes. When an XSLT file has already been associated with an integration system (e.g., as part of an Enterprise Interface Builder (EIB) or a Document Transformation Connector), updating it requires accessing the existing transformation configuration.

The 'Edit XSLT Attachment Transformation' task enables users to upload a revised version of the XSLT file. This action replaces the previous file while maintaining the integration system's configuration, ensuring continuity without necessitating additional changes to the system itself.

This task is distinct from other options because it specifically targets the transformation logic (XSLT) rather than broader integration components or services.

Let's examine why the other options are incorrect:

A . Edit Integration Attachment: This task is used to manage generic attachments associated with an integration, such as input files or supplementary documents, but it does not specifically address XSLT transformations. It lacks the precision required for updating transformation logic.

B . Edit Integration Attachment Service: This is not a recognized task in Workday's integration framework. It appears to be a conflation of terms and does not align with the documented processes for managing XSLT files.

D . Edit Integration Service Attachment: While this might suggest modifying an attachment related to an integration service, it is not the correct task for handling XSLT files in a document transformation context. Workday documentation consistently points to 'Edit XSLT Attachment Transformation' for this purpose.

The process typically involves:

Navigating to the integration system in Workday (e.g., via the 'Search' bar by entering the integration system name).

Using the related actions menu to select 'Integration System' > 'Edit XSLT Attachment Transformation.'

Uploading the new XSLT file, which must comply with Workday's size limitations (e.g., 30 MB for attachments) and be properly formatted.

Saving the changes, which updates the transformation logic without altering other integration configurations.

This approach ensures that transformations remain aligned with business requirements, such as reformatting data for compatibility with external systems, while leveraging Workday's secure and efficient integration tools.

:

Workday Pro Integrations Study Guide: 'Configure Integration System - TRANSFORMATION' section, which details the use of XSLT files in document transformations and the associated tasks.

Workday Documentation: 'Enterprise Interface Builder (EIB)' and 'Document Transformation Connector' sections, where the 'Edit XSLT Attachment Transformation' task is outlined for updating XSLT files.

Workday Community: Guidance on managing XSLT attachments, confirming this task as the standard method for updating pre-existing transformations.


Question 6

You have been asked to refine a report which outputs one row per worker and is being used in an integration that sends worker data to one of your third-party systems. The integration should only send workers who have been hired in the last 30 days. Where in the custom report definition can you specify a condition that would include only workers who have been hired in the last 30 days?

Correct Answer: D. Filter
Explanation:

In Workday, when refining a custom report to include specific conditions such as limiting the output to workers hired in the last 30 days, the appropriate place to specify this condition is within the Filter tab of the custom report definition. The Filter tab allows you to define criteria that determine which instances of the primary business object (in this case, 'Worker') are included in the report output. This is critical for integrations, as the filtered data ensures that only relevant records are sent to the third-party system.

The requirement here is to restrict the report to workers hired within the last 30 days. In Workday reporting, this can be achieved by adding a filter condition on the 'Hire Date' field of the Worker business object. Specifically, you would configure the filter to compare the 'Hire Date' against a dynamic date range, such as 'Current Date minus 30 days' to 'Current Date.' This ensures the report dynamically adjusts to include only workers hired in the last 30 days each time it runs, which aligns with the needs of an integration sending real-time data to a third-party system.

Here's why the other options are incorrect:

A . Subfilter: Subfilters in Workday are used to further refine data within a related business object or a subset of data already filtered by the primary filter. They are not the primary mechanism for applying a condition to the main dataset (e.g., all workers). For this scenario, a subfilter would be unnecessary since the condition applies directly to the Worker business object, not a related object.

B . Output: The Output section of a custom report definition controls how the report is displayed or delivered (e.g., file format, scheduling), not the data selection criteria. It does not allow for specifying conditions like hire date ranges.

C . Columns: The Columns tab defines which fields are displayed in the report output (e.g., Worker ID, Name, Hire Date). While you can add the 'Hire Date' field here for visibility, it does not control which workers are included in the report---that is the role of the Filter tab.

To implement this in practice:

In the custom report definition, go to the Filter tab.

Add a new filter condition.

Select the 'Hire Date' field from the Worker business object.

Set the operator to 'in the range' and define the range as 'Current Date - 30 days' to 'Current Date' (using dynamic date functions available in Workday).

Save and test the report to ensure it returns only workers hired within the last 30 days.

This filtered report can then be enabled as a web service (via the Advanced tab) or used in an Enterprise Interface Builder (EIB) or Workday Studio integration to send the data to the third-party system, meeting the integration requirement.

Reference from Workday Pro Integrations Study Guide:

Workday Report Writer Fundamentals: Section on 'Creating and Managing Filters' explains how filters are used to limit report data based on specific conditions, such as date ranges.

Integration System Fundamentals: Discusses how custom reports serve as data sources for integrations and the importance of filters in defining the dataset.

Core Connectors & Document Transformation: Highlights the use of filtered custom reports in outbound integrations to third-party systems.


Question 7

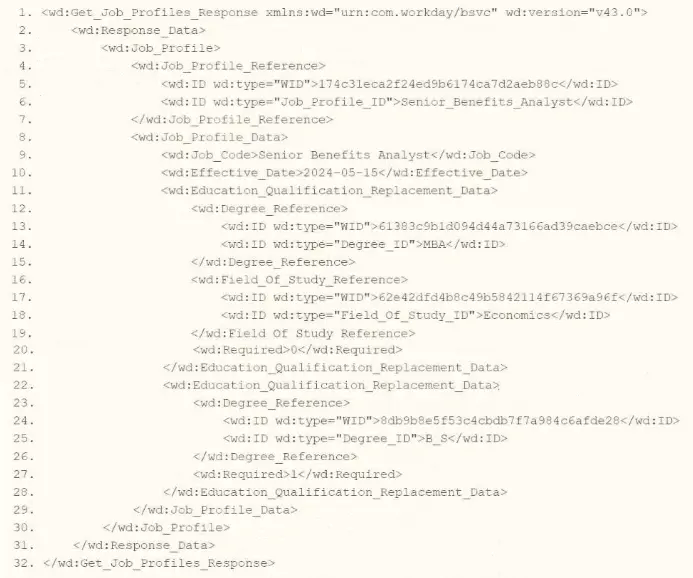
Refer to the following XML to answer the question below.

You are an integration developer and need to write XSLT to transform the output of an EIB which is making a request to the Get Job Profiles web service operation. The root template of your XSLT matches on the element. This root template then applies templates against . What XPath syntax would be used to select the value of the ID element which has a wd:type attribute named Job_Profile_ID when the element is placed within the template which matches on ?

Correct Answer: C. wd:Job_Profile_Reference/wd:ID[@wd:type='Job_Profile_ID']
Explanation:

As an integration developer working with Workday, you are tasked with transforming the output of an Enterprise Interface Builder (EIB) that calls the Get_Job_Profiles web service operation. The provided XML shows the response from this operation, and you need to write XSLT to select the value of the <wd:ID> element where the wd:type attribute equals 'Job_Profile_ID.' The root template of your XSLT matches on <wd:Get_Job_Profiles_Response> and applies templates to <wd:Job_Profile>. Within this template, you use the <xsl:value-of> element to extract the value. Let's analyze the XML structure, the requirement, and each option to determine the correct XPath syntax.

Understanding the XML and Requirement

The XML snippet provided is a SOAP response from the Get_Job_Profiles web service operation in Workday, using the namespace xmlns:wd='urn:com.workday/bsvc' and version wd:version='v43.0'. Key elements relevant to the question include:

The root element is <wd:Get_Job_Profiles_Response>.

It contains <wd:Response_Data>, which includes <wd:Job_Profile> elements.

Within <wd:Job_Profile>, there is <wd:Job_Profile_Reference>, which contains multiple <wd:ID> elements, each with a wd:type attribute:

<wd:ID wd:type='WID'>1740d3eca2f2ed9b6174ca7d2ae88c8c</wd:ID>

<wd:ID wd:type='Job_Profile_ID'>Senior_Benefits_Analyst</wd:ID>

The task is to select the value of the <wd:ID> element where wd:type='Job_Profile_ID' (e.g., 'Senior_Benefits_Analyst') using XPath within an XSLT template that matches <wd:Job_Profile>. The <xsl:value-of> element outputs the value of the selected node, so you need the correct XPath path from the <wd:Job_Profile> context to the specific <wd:ID> element with the wd:type attribute value 'Job_Profile_ID.'

Analysis of Options

Let's evaluate each option based on the XML structure and XPath syntax rules:

Option A: wd:Job_Profile_Reference/wd:ID/wd:type='Job_Profile_ID'

This XPath attempts to navigate from wd:Job_Profile_Reference to wd:ID, then to wd:type='Job_Profile_ID'. However, there are several issues:

wd:type='Job_Profile_ID' is not valid XPath syntax. In XPath, to filter based on an attribute value, you use the attribute selector [@attribute='value'], not a direct comparison like wd:type='Job_Profile_ID'.

wd:type is an attribute of <wd:ID>, not a child element or node. This syntax would not select the <wd:ID> element itself but would be interpreted as trying to match a nonexistent child node or property, resulting in an error or no match.

This option is incorrect because it misuses XPath syntax for attribute filtering.

Option B: wd:Job_Profile_Reference/wd:ID/@wd:type='Job_Profile_ID'

This XPath navigates to wd:Job_Profile_Reference/wd:ID and then selects the @wd:type attribute, comparing it to 'Job_Profile_ID' with =@wd:type='Job_Profile_ID'. However:

The =@wd:type='Job_Profile_ID' syntax is invalid in XPath. To filter based on an attribute value, you use [@wd:type='Job_Profile_ID'] as a predicate, not an equality comparison in this form.

This XPath would select the wd:type attribute itself (e.g., the string 'Job_Profile_ID'), not the value of the <wd:ID> element. Since <xsl:value-of> expects a node or element value, selecting an attribute directly would not yield the desired 'Senior_Benefits_Analyst' value.

This option is incorrect due to the invalid syntax and inappropriate selection of the attribute instead of the element value.

Option C: wd:Job_Profile_Reference/wd:ID[@wd:type='Job_Profile_ID']

This XPath navigates from wd:Job_Profile_Reference to wd:ID and uses the predicate [@wd:type='Job_Profile_ID'] to filter for <wd:ID> elements where the wd:type attribute equals 'Job_Profile_ID.'

In the XML, <wd:Job_Profile_Reference> contains:

<wd:ID wd:type='WID'>1740d3eca2f2ed9b6174ca7d2ae88c8c</wd:ID>

<wd:ID wd:type='Job_Profile_ID'>Senior_Benefits_Analyst</wd:ID>

The predicate [@wd:type='Job_Profile_ID'] selects the second <wd:ID> element, whose value is 'Senior_Benefits_Analyst.'

Since the template matches <wd:Job_Profile>, and <wd:Job_Profile_Reference> is a direct child of <wd:Job_Profile>, this path is correct:

<wd:Job_Profile> <wd:Job_Profile_Reference> <wd:ID[@wd:type='Job_Profile_ID']>.

When used with <xsl:value-of select='wd:Job_Profile_Reference/wd:ID[@wd:type='Job_Profile_ID']'/>, it outputs 'Senior_Benefits_Analyst,' fulfilling the requirement.

This option is correct because it uses proper XPath syntax for attribute-based filtering and selects the desired <wd:ID> value.

Option D: wd:Job_Profile_Reference/wd:ID/[@wd:type='Job_Profile_ID']

This XPath is similar to Option C but includes an extra forward slash before the predicate: wd:ID/[@wd:type='Job_Profile_ID']. In XPath, predicates like [@attribute='value'] are used directly after the node name (e.g., wd:ID[@wd:type='Job_Profile_ID']), not separated by a slash. The extra slash is syntactically incorrect and would result in an error or no match, as it implies navigating to a child node that doesn't exist.

This option is incorrect due to the invalid syntax.

Why Option C is Correct

Option C, wd:Job_Profile_Reference/wd:ID[@wd:type='Job_Profile_ID'], is the correct XPath syntax because:

It starts from the context node <wd:Job_Profile> (as the template matches this element) and navigates to <wd:Job_Profile_Reference/wd:ID>, using the predicate [@wd:type='Job_Profile_ID'] to filter for the <wd:ID> element with wd:type='Job_Profile_ID'.

It correctly selects the value 'Senior_Benefits_Analyst,' which is the content of the <wd:ID> element where wd:type='Job_Profile_ID'.

It uses standard XPath syntax for attribute-based filtering, aligning with Workday's XSLT implementation for web service responses.

When used with <xsl:value-of>, it outputs the required value, fulfilling the question's requirement.

Practical Example in XSLT

Here's how this might look in your XSLT:

<xsl:template match='wd:Job_Profile'>

<xsl:value-of select='wd:Job_Profile_Reference/wd:ID[@wd:type='Job_Profile_ID']'/>

</xsl:template>

This would output 'Senior_Benefits_Analyst' for the <wd:ID> element with wd:type='Job_Profile_ID' in the XML.

Verification with Workday Documentation

The Workday Pro Integrations Study Guide and SOAP API Reference (available via Workday Community) detail the structure of the Get_Job_Profiles response and how to use XPath in XSLT for transformations. The XML structure shows <wd:Job_Profile_Reference> containing <wd:ID> elements with wd:type attributes, and the guide emphasizes using predicates like [@wd:type='value'] to filter based on attributes. This is a standard practice for navigating Workday web service responses.

Workday Pro Integrations Study Guide Reference

Section: XSLT Transformations in EIBs -- Describes using XSLT to transform web service responses, including selecting elements with XPath and attribute predicates.

Section: Workday Web Services -- Details the Get_Job_Profiles operation and its XML output structure, including <wd:Job_Profile_Reference> and <wd:ID> with wd:type attributes.

Section: XPath Syntax -- Explains how to use predicates like [@wd:type='Job_Profile_ID'] for attribute-based filtering in Workday XSLT.

Workday Community SOAP API Reference -- Provides examples of XPath navigation for Workday web service responses, including attribute selection.

Option C is the verified answer, as it correctly selects the <wd:ID> value with wd:type='Job_Profile_ID' using the appropriate XPath syntax within the <wd:Job_Profile> template context.


Question 8

Which components make up the three primary parts of an outbound Enterprise Interface Builder (EIB)?

Correct Answer: A. One data source One transformation One delivery endpoint
Explanation:

An outbound EIB is organized around three main configuration components: Get Data, Transform, and Deliver. The Get Data section uses one data source, commonly a custom report or another supported source. The Transform section applies one transformation, such as an XSLT transformation, when formatting is required. The Deliver section sends the output to one delivery endpoint, such as SFTP, email, or another supported transport. Multiple data sources or multiple delivery endpoints are not the standard three-part model for a basic outbound EIB. A web service call and sequence generator may be used in some integration scenarios, but they are not the three primary EIB components. Therefore, option A matches the EIB architecture.


Question 9

When creating an ISU, what should you do to ensure the user only authenticates via web services?

Correct Answer: B. Select the Do Not Allow UI Sessions checkbox.
Explanation:

When creating an Integration System User (ISU) in Workday, the goal is often to ensure that the user is restricted to performing tasks via web services (e.g., API calls or integrations) and cannot log into the Workday user interface (UI). This is a critical security measure to limit the ISU's access to only what is necessary for integration purposes, adhering to the principle of least privilege. Let's evaluate each option provided in the question to determine the correct approach based on Workday's functionality and best practices as outlined in official documentation and the Workday Pro Integrations program.

Option A: Choose a constrained security group.In Workday, security groups define the permissions and access levels for users, including ISUs. There are two types of Integration System Security Groups (ISSGs): constrained and unconstrained. A constrained ISSG limits access to specific organizations or data scopes, while an unconstrained ISSG provides broader access across the tenant. While choosing a constrained security group can enhance security by limiting the scope of data the ISU can access, it does not directly control whether the ISU authenticates via web services or the UI. The type of security group affects data access permissions, not the authentication method or UI access. Therefore, this option does not address the requirement of ensuring authentication only via web services.

Option B: Select the Do Not Allow UI Sessions checkbox.When creating an ISU in Workday, the 'Create Integration System User' task presents an option labeled 'Do Not Allow UI Sessions.' Selecting this checkbox explicitly prevents the ISU from logging into the Workday UI using its credentials. This setting ensures that the ISU can only authenticate and operate through programmatic means, such as web service calls (e.g., SOAP or REST APIs), which is precisely the intent of the question. This is a standard security practice recommended by Workday to isolate integration activities from interactive user sessions, reducing the risk of misuse or unauthorized access through the UI. This option directly aligns with the requirement and is the correct answer.

Option C: Update the session timeout minutes.The 'Session Timeout Minutes' field in the ISU creation task determines how long an ISU's session remains active before it expires. By default, this is set to 0, meaning the session does not expire, which is suitable for integrations that require continuous operation without interruption. Updating this value (e.g., setting it to a specific number of minutes) would cause the session to time out after that period, potentially disrupting long-running integrations. However, this setting pertains to session duration, not the method of authentication or whether UI access is allowed. It does not prevent the ISU from logging into the UI or ensure that authentication occurs only via web services, making this option irrelevant to the question.

Option D: Generate a random password.Generating a random password for the ISU is a good security practice to ensure the credentials are strong and not easily guessable. However, the password itself does not dictate how the ISU authenticates or whether it can access the UI. A random password enhances security but does not inherently restrict the ISU to web service authentication. Without selecting 'Do Not Allow UI Sessions,' the ISU could still log into the UI with that password, assuming no other restrictions are applied. Thus, this option does not fulfill the requirement of ensuring authentication only via web services.

Why Option B is Correct

The 'Do Not Allow UI Sessions' checkbox is a specific configuration in the ISU setup process that directly enforces the restriction of authentication to web services. This setting is part of Workday's security framework for integrations, ensuring that ISUs---designed as non-human accounts for programmatic access---cannot be used interactively. This aligns with Workday's best practices for securing integrations, as outlined in the Workday Pro Integrations Study Guide and related documentation. For example, when an ISU is created with this checkbox selected, any attempt to log into the Workday UI with its credentials will fail, while web service requests (e.g., via SOAP or REST APIs) will succeed, assuming proper permissions are granted via an ISSG.

Practical Application

To implement this in Workday:

Log into your Workday tenant with administrative privileges.

Search for and select the 'Create Integration System User' task.

Enter a username and password for the ISU.

Check the 'Do Not Allow UI Sessions' checkbox.

Leave 'Session Timeout Minutes' at 0 (default) to avoid session expiration during integrations.

Save the ISU and assign it to an appropriate ISSG (constrained or unconstrained, depending on the integration's needs).

This configuration ensures the ISU is locked to web service authentication, meeting the question's objective.

Verification with Workday Documentation

The Workday Pro Integrations Study Guide emphasizes securing ISUs by restricting them to integration-specific tasks. The 'Do Not Allow UI Sessions' option is highlighted as a key control for preventing UI access, ensuring that ISUs operate solely through web services. This is also consistent with broader Workday security training materials, such as those available on Workday Community, which stress isolating integration accounts from human user activities.

Workday Pro Integrations Study Guide Reference

Section: Integration Security Fundamentals -- Discusses the role of ISUs and the importance of restricting their access to programmatic interactions.

Section: Configuring Integration System Users -- Details the 'Create Integration System User' task, including the 'Do Not Allow UI Sessions' checkbox as a security control.

Section: Best Practices for Integration Security -- Recommends using this setting to enforce least privilege and protect the tenant from unauthorized UI access by integration accounts.


Question 10

You have an existing EIB that you configured with a filename sequence generator that is associated with the EIB in the Deliver section. However, after testing the EIB, you notice that the filename is not using the configured sequence generator.

What is causing the sequence generator to not be used?

Correct Answer: A. The Determine Value at Runtime for the File Name launch parameter to choose the field Next Sequence for Integration File Utility was not used.
Explanation:

Creating or associating a filename sequence generator is not enough by itself. The EIB must be configured so the File Name launch parameter determines its value at runtime from the sequence generator utility. The correct runtime field is Next Sequence for Integration File Utility. If the launch parameter is not set this way, Workday can still use a static or manually supplied filename, which means the configured sequence generator will not drive the final output filename. Typing the sequence generator name as a static value would not invoke the generator. The issue is also not simply a transformation problem or delivery endpoint problem. The key configuration gap is that the runtime filename value was not linked to the sequence generator output.